Introduction to Chocolate Swiss Roll
Why a Chocolate Swiss Roll is the Ultimate Homemade Treat
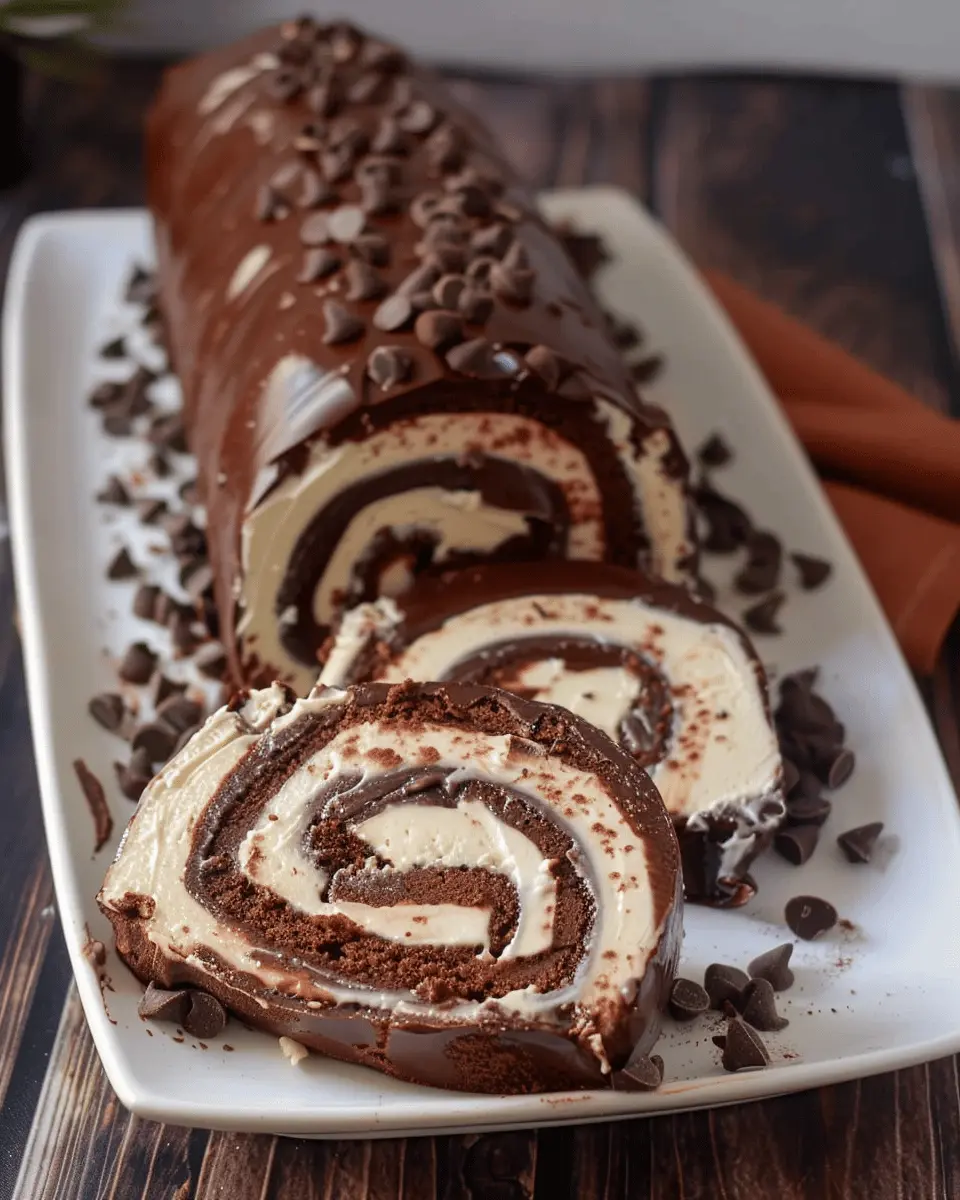
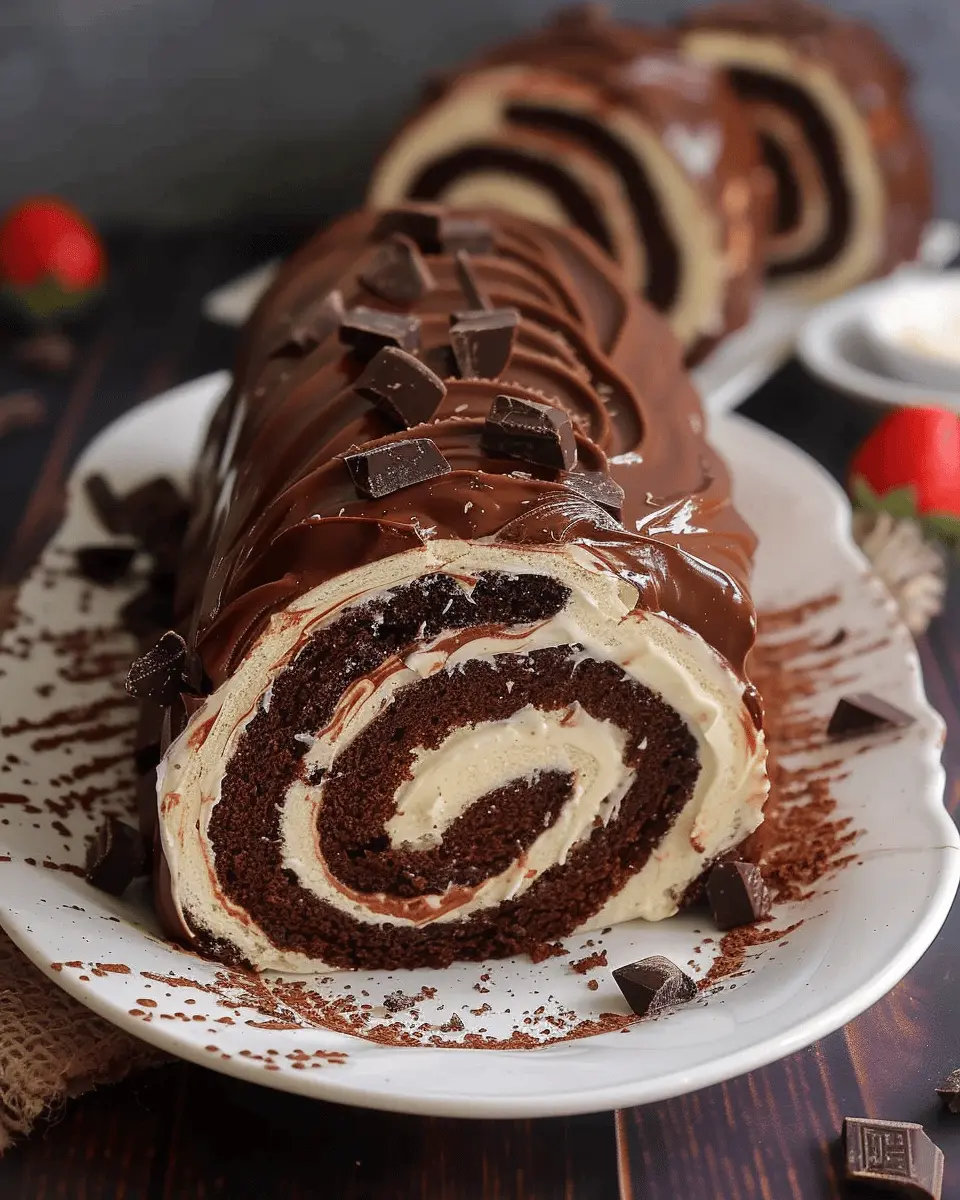
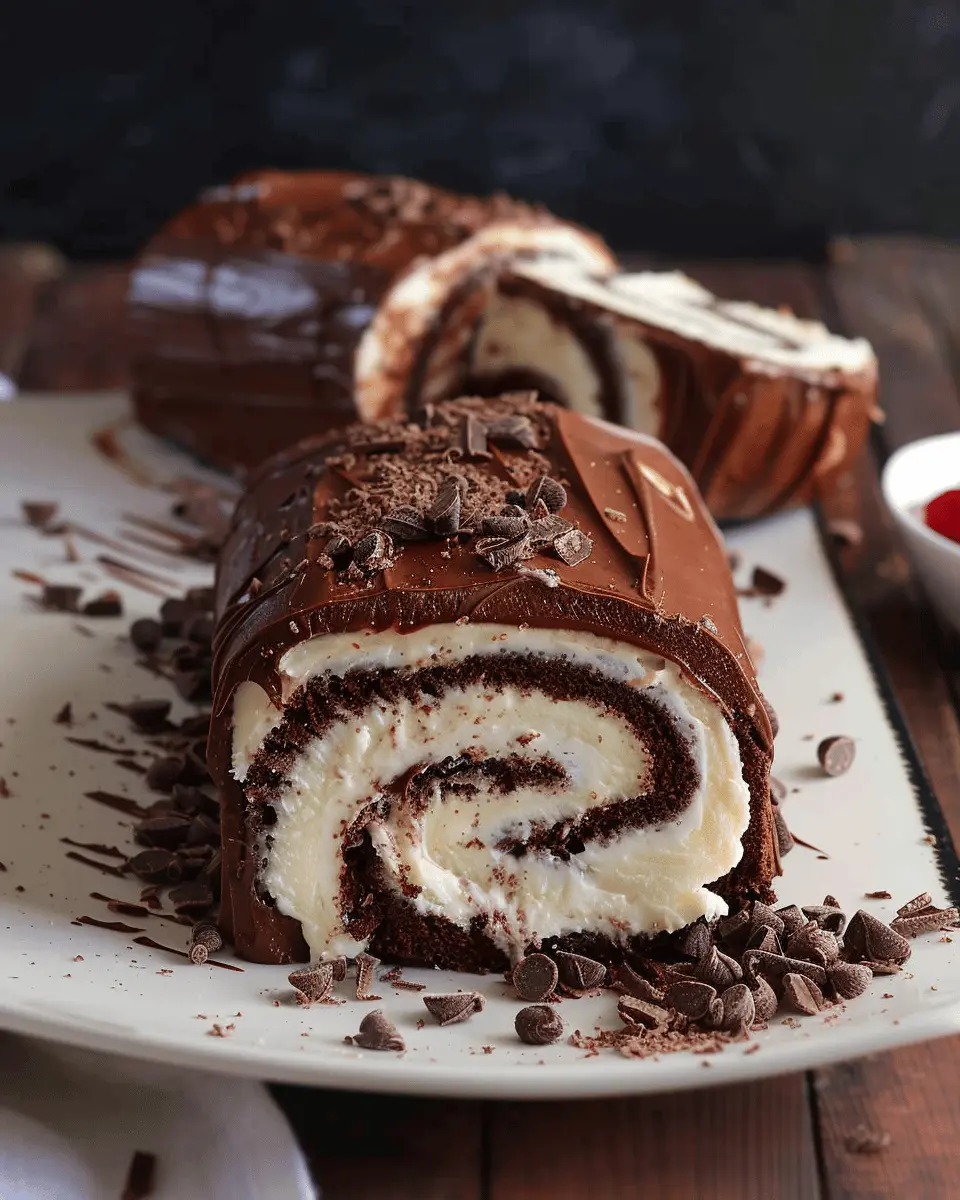
If you’re searching for a delightful dessert that perfectly marries indulgence and nostalgia, look no further than the chocolate swiss roll. This classic treat combines a light, airy sponge cake rolled around a rich, creamy filling—often chocolate or vanilla—resulting in a visually stunning dessert that is as enjoyable to make as it is to eat.
The first bite of a well-made chocolate swiss roll reveals a perfect balance of textures: the soft sponge yields easily to the creamy filling, creating a moment of pure bliss. But what truly elevates this dish is its versatility. It can be dressed up for special occasions, or simply enjoyed as a treat after a long week. The beauty of the swiss roll lies in the endless possibilities for fillings—think fresh fruits, flavored whipped cream, or even a touch of espresso for that caffeine kick.
Did you know that the origins of the Swiss roll can be traced back to the 15th century in Europe? According to Serious Eats, variations of this rolled cake can be found across the continent, from the decadent ‘Joconde’ in France to the traditional ‘Rote Grütze’ in Germany. This storied history adds a layer of charm to the recipe, inviting you to carry on a culinary tradition every time you whip one up in your kitchen.
Making a chocolate swiss roll is also a great way to impress friends and family. Hosting a dinner party or celebrating a birthday? Your guests will think you’ve slaved away in the kitchen, but in reality, it’s a straightforward process that can be completed in about an hour. Plus, it’s a great opportunity to unleash your creativity. Consider experimenting with different fillings or toppings to give your roll a personal touch.
Ultimately, baking a chocolate swiss roll is not just about the end product; it’s about the joy of creation and sharing something special. Whether you’re pulling it out of the oven for the first time or perfecting your technique, this treat is bound to bring smiles all around. So grab those ingredients, and let’s get rolling!
Ingredients for Chocolate Swiss Roll
Essential ingredients for a perfect roll
Creating a chocolate swiss roll is all about using the right ingredients to achieve that light and airy sponge. Here’s what you’ll need:
- All-purpose flour: ½ cup for the base.
- Cocoa powder: ¼ cup gives that rich chocolate flavor.
- Granulated sugar: ¾ cup, which adds sweetness and structural support.
- Eggs: 3 large eggs, crucial for the sponge’s lift.
- Vegetable oil: 2 tablespoons to keep it moist.
- Baking powder: 1 teaspoon to help the roll rise.
- Salt: Just a pinch balances the sweetness.
These essentials create a delightful foundation for your roll. Want to dive deeper into the science of baking? Check out this article on the importance of eggs in baking.
Optional toppings and garnishes
To really elevate your chocolate swiss roll, consider these fun additions:
- Whipped cream: A dollop on top makes it extra creamy.
- Fresh berries: Strawberries or raspberries add a pop of color and tartness.
- Chopped nuts: Toasted almonds or hazelnuts can introduce a delightful crunch.
- Chocolate ganache: Pouring this over adds an indulgent touch.
Mix and match these to personalize your dessert experience! What’s your favorite pairing?
Preparing the Chocolate Swiss Roll
Making a chocolate swiss roll may seem daunting, but with a little guidance, you’ll be rolling out this delightful dessert in no time. Let’s break it down step by step.
Preheat the oven and prepare your pan
Begin your culinary adventure by preheating your oven to 350°F (175°C). While it heats, take a moment to prepare your baking pan. Line a 15×10-inch jelly roll pan with parchment paper, making sure to leave some overhang—this will help you remove the cake easily later. For an extra layer of assurance, lightly grease the sides and the parchment with butter or non-stick spray.
Sift and mix the dry ingredients
Next, let’s gather the dry ingredients that will give your chocolate swiss roll structure and flavor. In a medium bowl, sift together:
- 1 cup all-purpose flour
- 1/2 cup cocoa powder
- 1 teaspoon baking powder
- 1/4 teaspoon salt
Sifting not only removes lumps but also aerates the ingredients, which is crucial for achieving that light, fluffy texture. You might be wondering why cocoa powder itself can be a little tricky to work with. Cocoa can have clumps, which is why sifting is essential. Plus, this ensures the chocolate flavor is evenly distributed throughout your cake.
Beat eggs and sugar to a fluffy consistency
In a large mixing bowl, it’s time to beat the eggs. Whisk together three large eggs with 3/4 cup of granulated sugar until the mixture becomes pale and fluffy—this can take about 5 minutes with an electric mixer. This step is essential as it incorporates air, contributing to the overall lightness of your chocolate swiss roll. If you’re like me, you might be using a hand mixer, which can be a great workout!
Carefully combine wet and dry components
Once your egg mixture is nice and airy, it’s time to fold in the dry ingredients. But be gentle! Using a spatula, add the sifted flour and cocoa mixture in two or three additions, ensuring you maintain the airiness of the batter. This delicate folding technique helps create a tender cake.
To enhance the chocolate flavor, you can also incorporate a teaspoon of vanilla extract at this stage. It’s these little additions that make a world of difference in baking.
Bake and roll the cake while warm
Now that your batter is ready, pour it into the prepared jelly roll pan, spreading it evenly. Bake in the preheated oven for about 12-15 minutes. You’ll know it’s done when it springs back when lightly touched. While it’s still warm, carefully turn the cake onto a clean kitchen towel dusted with confectioners’ sugar. Roll it up gently starting from one end, towel included, and let it cool completely. This step is crucial, as it helps create the classic swiss roll shape.
Whip up the vanilla cream filling
While your chocolate swiss roll cools, it’s filling time! In a mixing bowl, whip together 1 cup of heavy cream with 1/4 cup of powdered sugar and 1 teaspoon of vanilla extract until soft peaks form. If you’ve never whipped cream before, it’s a game-changer for desserts—just remember to keep a close eye on it, as over-whipping can turn it to butter!
Fill and roll the cake
Once your cake has cooled completely, unroll the cake and remove the towel. Spread a generous layer of whipped vanilla cream over the surface, leaving a small border around the edges. Carefully roll the cake back up without the towel, pressing gently to ensure that the filling stays inside.
Coat with chocolate ganache
For the pièce de résistance, let’s make a simple chocolate ganache. Heat 1/2 cup of heavy cream until it simmers, then pour it over 4 ounces of chopped semi-sweet chocolate. Stir until smooth. Drizzle this luscious ganache over your rolled cake for that perfect, glossy finish.
And there you have it! A stunning chocolate swiss roll to impress your friends or family. Each bite is a harmonious blend of chocolate, cream, and indulgence—truly a dessert deserving of any celebration.
If you’d like to discover more about the science behind baking or tips on variations, check out resources like Serious Eats for invaluable insights. Happy baking!
Variations on Chocolate Swiss Roll
Creating a chocolate Swiss roll is just the beginning of your culinary exploration! There are countless variations to delight your taste buds and impress your friends. Let’s dive into a few exciting ideas that will keep your baking journey fresh and fun.
Classic Rolled Chocolate Cake
The foundation of any great chocolate Swiss roll is the classic rolled chocolate cake. With its rich cocoa flavor and fluffy texture, this base is perfect for pairing with various fillings. If you’re sticking to tradition, a simple whipped cream or chocolate ganache filling can elevate your dessert while bringing out that distinctive chocolatey goodness. The key is to bake it until the edges just start to crack—this ensures a flexible roll that won’t break apart when you slice!
Fruit-Filled Chocolate Swiss Roll
Want a twist? Try a fruit-filling for a refreshing contrast. Using puréed strawberries or raspberries can add a tartness that complements the sweet chocolate beautifully. Not only does this make your chocolate Swiss roll visually appealing, but it also amps up the flavor profile. You can even layer in some fresh fruit pieces for that extra pop of texture and freshness!
Vegan or Dairy-Free Chocolate Roll
For those following a vegan or dairy-free lifestyle, crafting a chocolate Swiss roll is surprisingly easy! Substitute eggs with flaxseed meal or aquafaba, and use almond or coconut milk. For the filling, consider using a silken tofu-based chocolate mousse—it’s silky, rich, and packed with protein! Many resources, like The Vegan Society, provide fantastic ideas for alternatives that won’t compromise taste.
Exploring these variations can turn a simple dessert into a delightful masterpiece. Remember, cooking is all about creativity, so don’t hesitate to mix and match ingredients to find your perfect combo! Want more inspiration? Check out BBC Good Food for diverse recipe ideas. Happy baking!
Baking notes for Chocolate Swiss Roll
Common pitfalls and how to avoid them
When making a chocolate swiss roll, it’s easy to run into a few tricky situations. One common mistake is overmixing the batter. This can incorporate too much air, resulting in a dry cake. Instead, mix just until blended. Also, be careful not to underbake; a roll that’s too soft might tear when you try to roll it up. Remember, a toothpick inserted in the center should come out clean!
Importance of room temperature ingredients
Using room temperature ingredients is crucial for a successful chocolate swiss roll. Cold eggs don’t whip as well and can lead to a denser cake. Allow your eggs and butter to sit out for about 30 minutes before you start baking. This small step can make a big difference in achieving that light and airy texture we all love in a roll. For more tips on ingredient temperatures, check out this helpful guide.
With a little care and consideration, your chocolate swiss roll can be a stunning dessert that impresses anyone lucky enough to have a slice!

Serving suggestions for Chocolate Swiss Roll
Perfect pairings for a chocolate roll dessert
When indulging in a chocolate swiss roll, consider ways to elevate its richness. Pair it with fresh berries like strawberries or raspberries for a splash of tartness that beautifully balances the sweetness. A scoop of creamy vanilla ice cream can enhance the luxurious feel of each bite, creating a delightful contrast in textures.
If you’re looking for a light and refreshing drink, a homemade mint lemonade or herbal iced tea can complement the deep cocoa flavors without overpowering them.
Creative plating ideas
Presentation matters just as much as taste! For your chocolate swiss roll, try slicing the roll into generous pieces and placing them on a stylish plate with a drizzle of warm chocolate sauce or a dusting of powdered sugar. You can also create a vibrant effect by arranging slices atop a bed of mixed fruit coulis—a mix of pureed strawberries and raspberries works wonders.
For an extra touch of flair, garnish with fresh mint leaves or edible flowers. These small details can impress your friends and make your dessert tables pop!
For inspiration on pairing or plating, check out BBC Good Food or Food Network.
Tips for Making the Perfect Chocolate Swiss Roll
Achieving the Ideal Roll Without Cracks
Creating the ultimate chocolate swiss roll can feel daunting, but fear not—crack-free rolling is within your reach! Start by ensuring your sponge cake is baked to perfection; it should be light and springy. After removing it from the oven, let it cool for just a few minutes before inverting it onto a clean kitchen towel. This allows the cake to adopt the right shape as it cools.
When rolling, be gentle yet firm. Use the towel to help guide the cake while rolling it from the short end towards the opposite side. For a seamless finish, wrap the rolled cake in the towel for about 30 minutes. This promotes flexibility and reduces the chance of cracks. If you’re curious about more techniques, check out this helpful guide from BBC Good Food.
Recommendations for Storing Leftovers
If you happen to have any leftover chocolate swiss roll, storing it correctly will keep it fresh and delicious. Wrap the roll tightly in plastic wrap, ensuring no air can reach it. This helps prevent it from drying out. You can also place it in an airtight container for added protection.
For longer storage, consider refrigerating it for up to 5 days, or freeze slices for up to 3 months. When you’re ready to enjoy it again, let it thaw in the fridge overnight for the best taste. Trust me, nothing beats a slice of chocolatey goodness on a cozy evening!
Time details for Chocolate Swiss Roll
When it comes to creating a delightful chocolate swiss roll, time management is key! Here’s a quick breakdown of how long you can expect each step to take.
Preparation Time
The preparation for your chocolate swiss roll will take about 20 minutes. This includes gathering your ingredients, mixing, and preparing your baking tray. Make sure to have everything ready before you start; it makes the process smoother!
Baking Time
Once you’ve prepped the batter, pop it in the oven! The baking time is approximately 12-15 minutes. Your roll should rise beautifully and have a slight spring when gently touched.
Total Time
Adding both preparation and baking times together, you’re looking at around 35-40 minutes from start to finish. It’s a quick treat that will impress family and friends alike!
Have you ever had the experience of watching a dessert come to life? The aroma of the chocolate swiss roll filling your kitchen is truly something special. For more tips, feel free to check out this helpful baking guide that shares insights on baking techniques!
Nutritional Information for Chocolate Swiss Roll
Calories per Serving
A delightful slice of Chocolate Swiss Roll typically packs around 200-250 calories. This makes it a sweet treat that won’t completely derail your dietary goals, especially if enjoyed in moderation! Remember, sharing a slice can be a great way to indulge without the guilt.
Carbohydrates and Fats Breakdown
When diving into the chocolate swiss roll, you’ll find a comforting mix of carbs and fats:
- Carbohydrates: Approximately 30-35 grams per slice, mainly from sugar and flour.
- Fats: 10-12 grams, primarily coming from eggs and butter, contributing to that rich, moist texture.
If you’re curious about how these figures compare to other desserts, check this Nutritional Guide for valuable insights on sweet treats.
Thinking about making healthier choices? Consider swapping some ingredients, like using alternatives for sugar or butter. Substituting Greek yogurt for butter could cut down on calories and fats while providing a protein boost!
Whether you’re planning a family gathering or just treating yourself after a long week, understanding the nutritional content can help you enjoy your chocolate swiss roll responsibly. Happy baking!
FAQs about Chocolate Swiss Roll
Can I make the cake ahead of time?
Absolutely! One of the great things about a chocolate Swiss roll is its versatility. You can bake the cake a day ahead and store it tightly wrapped in plastic wrap at room temperature. This not only saves you time but also allows flavors to meld. If you plan to fill it later, make sure to add the filling closer to serving time to maintain that fluffy texture.
What should I do if my cake cracks while rolling?
If your chocolate Swiss roll cracks, don’t panic! It happens to the best of us. Here’s what you can do:
-
Use a little filling as glue. If there’s a crack, spread a thin layer of filling over the area before rolling. This can hold the pieces together.
-
Embrace the rustic look. Remember that a cracked roll can still taste delicious, and it might even look charming!
-
Practice makes perfect. The more you roll, the better you’ll get. Sometimes, it helps to cool the cake a little longer before rolling.
How can I customize my chocolate Swiss roll?
Customization is key! Here are some fun ideas:
- Fillings: Swap out traditional cream for whipped mascarpone or a fruit puree.
- Toppings: Drizzle with caramel or chocolate ganache, or add fresh berries for a burst of flavor.
- Spices: Try adding a pinch of chili powder or espresso powder to the batter for a unique twist.
Feeling adventurous? Check out this ChocolaTastic Swiss Roll, which might inspire your own creation!
By exploring these avenues, your chocolate Swiss roll will be as unique as your tastes. Happy baking!
Conclusion on Chocolate Swiss Roll
Making a chocolate swiss roll at home is a delightful endeavor that not only challenges your baking skills but rewards you with a scrumptious dessert to share. Whether you’re a seasoned baker or trying your hand at something new, this recipe is forgiving and fun. Plus, nothing beats the satisfaction of slicing into a beautifully rolled cake and revealing the swirls of rich chocolate.
So, why not gather your ingredients and give it a go? Explore tips and techniques shared by baking enthusiasts on The Kitchn or discover variations on BBC Good Food. Your chocolate swiss roll adventure awaits!
PrintChocolate Swiss Roll: The Indulgent Recipe You’ll Love to Make

This Chocolate Swiss Roll is an indulgent dessert that’s perfect for any occasion. With its rich chocolate flavor and light, airy texture, you’ll fall in love with making this delightful treat.
- Prep Time: 20 minutes
- Cook Time: 15 minutes
- Total Time: 1 hour 35 minutes
- Yield: 8 servings
- Category: Dessert
- Method: Baking
- Cuisine: American
- Diet: Vegetarian
Ingredients
- 4 large eggs
- 1 cup granulated sugar
- 1 cup all-purpose flour
- 1/2 cup cocoa powder
- 1 teaspoon baking powder
- 1/4 teaspoon salt
- 1/4 cup butter, melted
- 1 teaspoon vanilla extract
- 1 cup heavy cream
- 1/2 cup powdered sugar
Instructions
- Preheat the oven to 350°F (175°C). Grease a jelly roll pan and line it with parchment paper.
- In a mixing bowl, beat the eggs and granulated sugar until thick and pale.
- Sift the flour, cocoa powder, baking powder, and salt together, then fold into the egg mixture.
- Add melted butter and vanilla extract, mixing until smooth.
- Spread the batter evenly in the prepared pan and bake for 12-15 minutes.
- Once baked, turn the cake onto a clean kitchen towel dusted with powdered sugar.
- Roll the cake up in the towel and let it cool completely.
- While cooling, whip the heavy cream with powdered sugar until stiff peaks form.
- Unroll the cooled cake, spread the whipped cream evenly, and roll it up again.
- Chill in the refrigerator for at least 1 hour before serving.
Notes
- For a richer flavor, add a tablespoon of coffee to the batter.
- Be gentle when rolling the cake to avoid breaking it.
Nutrition
- Serving Size: 1 slice
- Calories: 250
- Sugar: 15g
- Sodium: 150mg
- Fat: 12g
- Saturated Fat: 7g
- Unsaturated Fat: 3g
- Trans Fat: 0g
- Carbohydrates: 30g
- Fiber: 2g
- Protein: 4g
- Cholesterol: 100mg