Introduction to Stained Glass Cookies
When you think about homemade treats, what comes to mind? Classic cookies, brownies, or maybe that tempting pie from your childhood? One delightful option that deserves your attention is stained glass cookies. These stunningly beautiful treats not only taste amazing but also bring a cheerful splash of color to your dessert table.
Why are stained glass cookies a delightful choice for homemade treats?
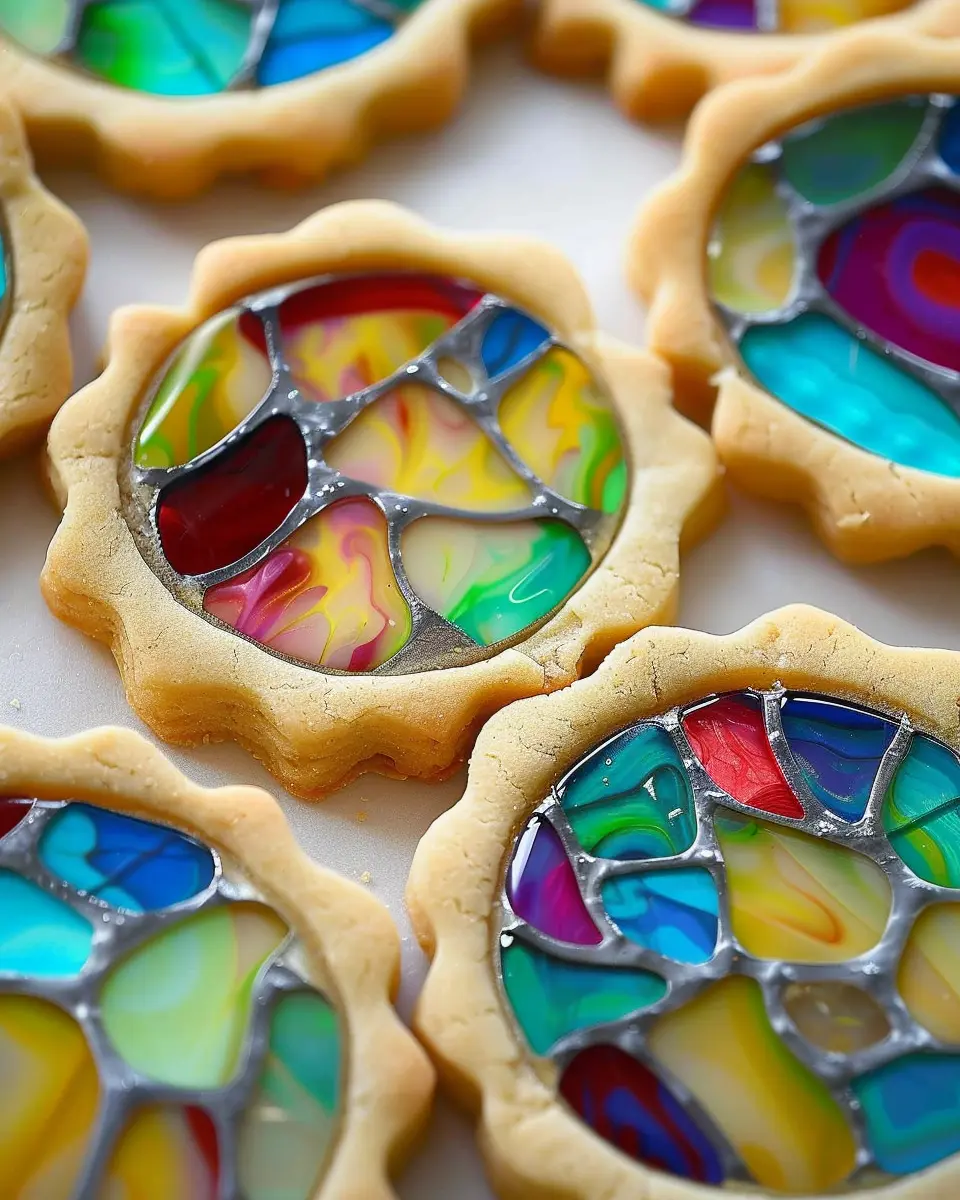
Let’s face it—who wouldn’t want to bite into a cookie that looks like it belongs in a fancy pastry shop? Stained glass cookies are perfect for various occasions, whether it’s a festive celebration, a casual get-together, or even a bake sale. Their vibrant, jewel-like windows made from crushed hard candies make them eye-catching, while the buttery cookie base provides a wonderful taste experience.
Making stained glass cookies can also be a fun activity. Picture this: you invite a few friends over, roll up your sleeves, and start mixing and molding. Not only do you get to indulge in your sweet creativity, but you’ll also create lasting memories with your friends. It’s a simple and interactive way to bond while bringing joy to your taste buds—who could say no to that?
Additionally, these cookies are incredibly versatile. You can customize them to suit any season or holiday. Imagine heart-shaped cookies filled with red and pink candies for Valentine’s Day or star-shaped cookies using blue and white candies for a winter celebration. The possibilities are endless! You can always check out resources like The Kitchn for tips on flavor variations and decorations.
Plus, if you’re someone who enjoys gifting baked goods, stained glass cookies make for a thoughtful present. They can brighten someone’s day, especially when they’re beautifully packaged in a gift box or tin. Everyone loves the attention to detail and personal touch of homemade treats!
In short, stained glass cookies are not just cookies; they are a delightful fusion of art and flavor. So roll up your sleeves and get ready to make something truly special!
Ingredients for Stained Glass Cookies
Creating stained glass cookies is a delightful and visually stunning experience that will impress anyone who sees them. Let’s break down the essential ingredients you’ll need!
Essential Ingredients for Cookie Dough
To whip up the perfect cookie dough, gather the following staples:
- Flour: Essential for structure, all-purpose flour works best.
- Butter: Unsalted, at room temperature for that creamy texture.
- Sugar: Granulated sugar will give your cookies that sweet crunch.
- Eggs: You’ll need one or two, depending on your batch size.
- Baking powder and salt: These help the cookies rise and enhance flavor.
Colorful Hard Candies for the Stained Glass Effect
The magic of stained glass cookies comes alive with vibrant hard candies. Use any combination of:
- Jolly Ranchers
- Life Savers
- Werther’s Originals
Crush these candies for the stained glass effect and watch them create a rainbow of colors in each cookie!
Optional Ingredients for Decoration
Feel free to get creative with your decorations! Some fun options include:
- Icing: Add flair with royal icing for designs.
- Sprinkles: A dash of festive sprinkles can take your cookies to the next level.
- Nuts or dried fruits: These can offer an extra texture and flavor dimension.
With these ingredients in hand, you’re ready to embark on your stained glass cookie journey! If you want more tips and tricks on baking, consider checking out King Arthur Baking for expert advice. Happy baking!
Step-by-step Preparation of Stained Glass Cookies
Making stained glass cookies can feel like a daunting task, but trust me—it’s all about taking it step-by-step. The visual appeal of these cookies, with their vibrant, jewel-toned centers, makes them the perfect treat for any occasion. Whether you’re prepping for a holiday gathering or want to impress your friends at a casual get-together, these cookies are sure to be a hit. Here’s how to make them!
Make the cookie dough
First things first, let’s whip up the cookie dough. Here’s everything you’ll need:
- 2 ½ cups all-purpose flour
- 1 teaspoon baking powder
- ½ teaspoon salt
- ¾ cup unsalted butter, softened
- 1 cup granulated sugar
- 1 large egg
- 1 teaspoon vanilla extract
- Begin by whisking together the flour, baking powder, and salt in a medium bowl. This will help aerate the flour and evenly distribute the leavening agent.
- In a separate large bowl, cream the softened butter and sugar together until light and fluffy. This step is crucial as it creates air pockets that help your cookies rise beautifully.
- Beat in the egg and vanilla extract until fully combined.
- Gradually add the flour mixture to the wet ingredients, mixing until a dough forms. If it feels too sticky, don’t hesitate to add a little more flour.
Pro tip: For best results, use a kitchen scale for measuring your flour; it makes a noticeable difference!
Chill and roll out the dough
Once your dough is ready, it’s time to let it chill. Chilling the dough not only prevents your cookies from spreading too much while baking, but it also allows the flavors to meld.
- Shape the dough into a disk, wrap it in plastic wrap, and refrigerate for at least 1 hour. This step is essential so your stained glass cookies maintain their shape during baking.
- After chilling, sprinkle a clean surface with flour and roll out the dough to about ¼-inch thickness. You want it thick enough to hold the candy but thin enough to bake evenly.
Cut out the shapes
Now comes the fun part—cutting out beautiful shapes for your stained glass cookies.
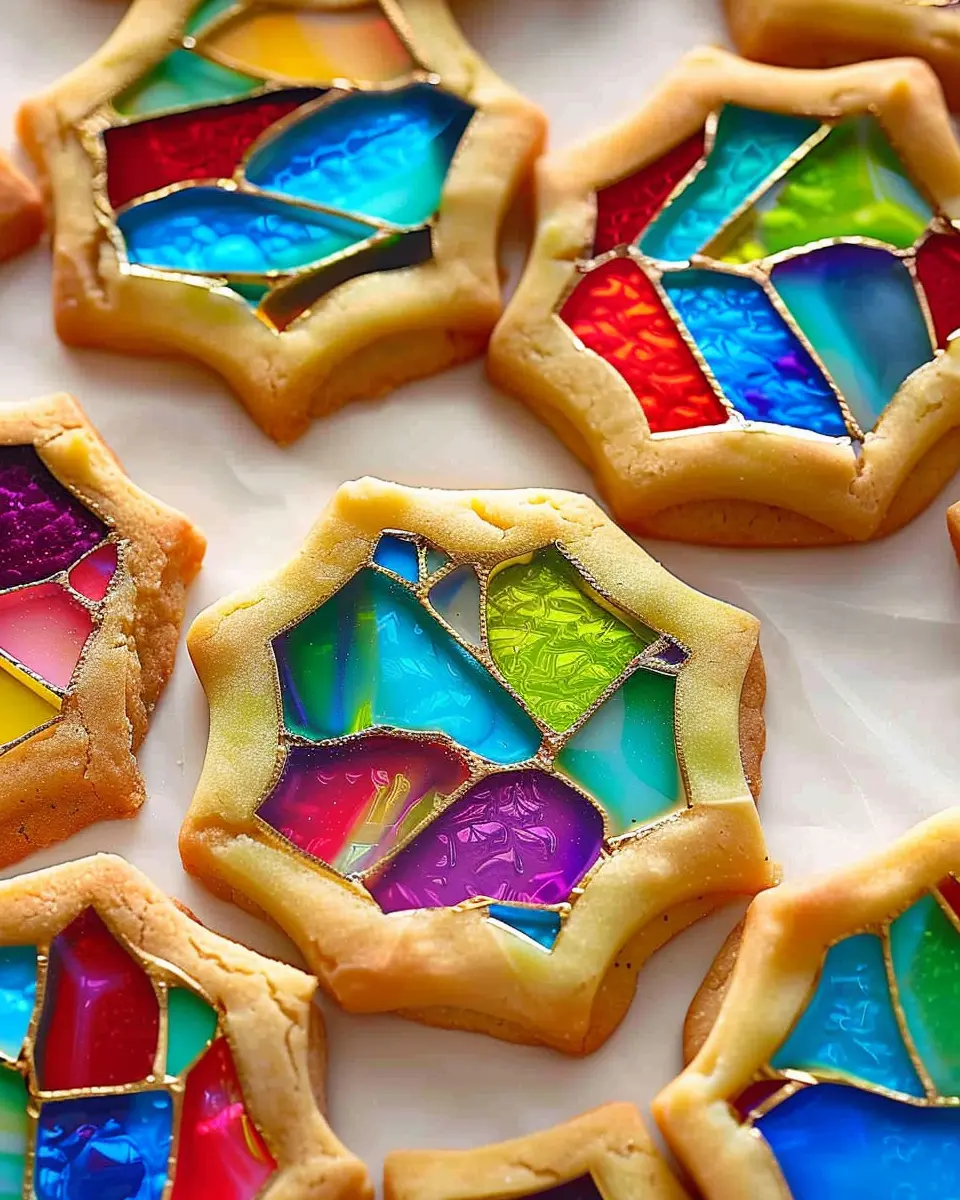
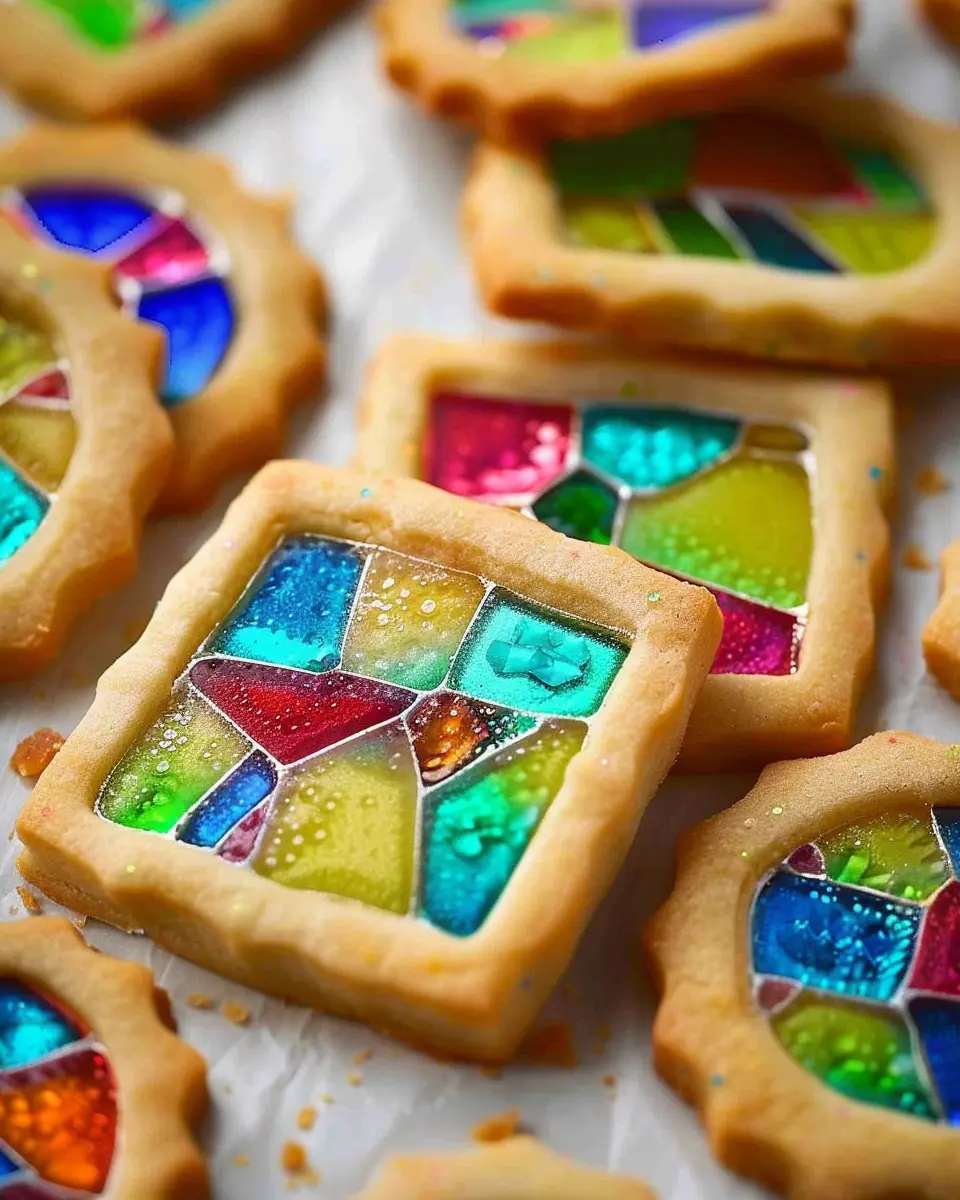
- Use cookie cutters of your choice to cut out shapes. Classic silhouettes like stars, hearts, or holiday-themed shapes can work wonders for your festive cookie tray.
- Remember to use a smaller cutter to create a window in the center of each shape. This is where your crushed candy will go!
Tip: If you’re making these for a specific event, don’t hesitate to get creative with your shapes to match the theme.
Fill with crushed candies
This is where the magic happens that transforms ordinary cookies into beautiful stained glass cookies.
- Crush some hard candies (like Jolly Ranchers or Life Savers) into small pieces. You want them fine enough to fill the shapes but not so fine that they turn into powder.
- Carefully fill the cut-out sections of your cookies with the crushed candy. Leave a little space at the edges, as the candies will melt and spread during baking.
Bake and cool the cookies
Finally, it’s time for the grand bake!
- Preheat your oven to 350°F (175°C).
- Place the cookies on a parchment-lined baking sheet and bake for about 8-10 minutes or until the edges are just beginning to brown. Keep an eye on them—the melted candy will bubble and may even overflow.
- Allow the cookies to cool on the sheet for a few minutes before transferring them to a wire rack to cool completely.
And that’s all there is to it! Your stained glass cookies are ready to dazzle with their colorful centers. Feel free to drizzle icing on top for an extra touch of sweetness or enjoy them as is. Happy baking!
Variations on Stained Glass Cookies
Stained glass cookies are a delightful treat that can be customized for any occasion. Whether you’re celebrating a holiday, a birthday, or just a cozy weekend, these cookies can bring a burst of color and charm to your gatherings. Let’s explore how you can tweak this classic recipe to suit your needs.
Different shapes for festive occasions
Creating stained glass cookies doesn’t have to be limited to traditional round shapes. Use cookie cutters to make festive-themed designs! For Christmas, consider stars, snowflakes, or Christmas trees. Halloween calls for pumpkins, bats, or ghosts, and Valentine’s Day is perfect for hearts. Thematic shapes not only enhance visual appeal but also add personal touches to your celebrations. Plus, it’s a fun activity to get friends or family involved in the decorating process!
Alternative candies for varied colors and flavors
When choosing candies to make your cookie “stained glass,” think beyond the usual. While Jolly Ranchers are popular for their vibrant colors, why not explore other options?
- Life Savers offer a variety of hues and flavors.
- Skittles can bring an explosion of color and a fruity twist.
- M&M’s provide customizable colors and are fun to match with any theme.
Experimenting with different candies can lead to unique flavor profiles and eye-catching designs. If you’re curious about the science behind the melting process, check out this guide from The Spruce Eats. Each variation will give your stained glass cookies a distinct taste and a colorful flair that will wow your guests.
By personalizing your stained glass cookie designs and flavor combinations, you create a truly unique sugary masterpiece that reflects your creativity and the joyous spirit of the occasion. Happy baking!
Cooking Tips and Notes for Stained Glass Cookies
Achieving the Perfect Dough Consistency
When crafting stained glass cookies, the key to success lies in getting your dough right. Aim for a soft, manageable texture that’s not too sticky. If you find your dough sticking to your hands, add a touch more flour, a tablespoon at a time. Conversely, if it feels too dry and crumbly, a teaspoon of cream or water can help bring it all together. This balance is crucial for ensuring your cookies maintain their shape during baking.
How to Prevent the Cookies from Spreading
To keep your stained glass cookies from spreading into abstract shapes, chill the dough for at least an hour before rolling it out. This solidifies the fats and helps the cookies retain their intended form. Also, using parchment paper on your baking sheets can create a barrier that helps prevent unwanted sticking and spreading. Following these simple tips will ensure your cookies not only taste incredible but look picture-perfect too!
For more ideas on decorating and presenting your cookies, check out this guide on creative cookie designs!

Serving Suggestions for Stained Glass Cookies
Creative Ways to Present Your Cookies
Presentation can elevate the experience of enjoying your stained glass cookies. Consider placing them on a decorative cake stand for a charming display at your next gathering. You could also create a colorful cookie platter by mixing different shapes and colors; this is particularly delightful for holidays or festive occasions. Adding some edible glitter or dusting with powdered sugar can make them even more visually appealing. For a unique touch, package a few cookies in clear treat bags tied with a ribbon, perfect for gifts!
Pairing Suggestions with Beverages
Wondering what to pair with your stained glass cookies? A warm cup of chamomile tea or refreshing iced herbal tea complements these sweet treats beautifully. If you prefer something bubbly, sparkling water with a twist of lemon adds a zesty contrast. For coffee lovers, a rich espresso or creamy cappuccino can enhance the cookies’ sweetness while providing an inviting aroma. Remember, balancing flavors is key to an enjoyable pairing experience! Check out resources like Tea Guide for more beverage ideas that could elevate your cookie enjoyment.
Time Breakdown for Making Stained Glass Cookies
When it comes to creating those delightful stained glass cookies, managing your time will make the process smoother and more enjoyable. Here’s a quick overview of what to expect:
Preparation time
Expect about 20 minutes for mixing your dough and creating your colorful candy centers. This is your chance to unleash creativity with cookie shapes and colors!
Chilling time
Allow 1 hour for the dough to chill in the refrigerator. This step is crucial, as it helps the cookies hold their shape while baking.
Baking time
The stained glass cookies need 10-12 minutes in the oven. Keep an eye on them—you want that perfect golden edge!
Total time
In total, you’re looking at roughly 1 hour and 30 minutes from start to finish. A small investment for a deliciously stunning result, don’t you think?
If you’re curious for more tips, check out resources on cookie decorating or chilling cookie dough. Enjoy the process!
Nutritional Facts for Stained Glass Cookies
When it comes to enjoying those delightful stained glass cookies, it’s important to know what you’re munching on! Here’s a breakdown of the nutritional content, so you can indulge mindfully.
Calories per cookie
Each stained glass cookie contains approximately 90-100 calories. Perfect for satisfying your sweet tooth without completely derailing your day!
Sugar and fat content
These cookies typically boast around 6 grams of sugar and about 4 grams of fat each. While they are a yummy treat, it’s wise to enjoy them in moderation due to their sugar content. For a healthier alternative, consider using a sugar substitute.
Storage instructions
To keep your stained glass cookies fresh, store them in an airtight container at room temperature for up to one week. If you want to extend their shelf life, freezing them is a great option; just ensure they are well-wrapped to avoid freezer burn.
For additional tips on ingredient substitutions or health-conscious baking, check out reputable resources like the American Heart Association or Nutrition.gov. Keeping track of how these delicious cookies fit into your overall diet can help you enjoy them even more!
FAQs about Stained Glass Cookies
How can I make my stained glass cookies even more colorful?
To achieve vibrant hues in your stained glass cookies, consider using flavored hard candies that come in a variety of bright colors. Brands like Jolly Rancher or Life Savers work fabulously because they melt down beautifully! You can also mix and match candy colors to create a rainbow effect. Additionally, adding a few drops of food coloring to your dough can give a whimsical twist, but make sure to keep the dough’s texture intact.
What’s the best way to store leftover cookies?
Once your delicious stained glass cookies have cooled, store them in an airtight container at room temperature. This helps maintain their crispiness while preventing them from becoming too soft. If you want to prolong their freshness, consider layering them with parchment paper to avoid sticking. Typically, they will last about a week, but trust me—if they’re as tasty as they look, they probably won’t be around that long!
Can I substitute ingredients in this recipe?
Absolutely! Baking is often about creativity. You can easily substitute different types of flour, like almond or coconut flour, if you’re aiming for gluten-free options. If you don’t have specific flavorings like vanilla extract, try almond or lemon extract for a unique twist. Substitute the butter with coconut oil to make your stained glass cookies a bit more tropical. Just remember, while substitutions can change the texture or flavor, baking is an adventure!
Feel free to check out resources like King Arthur Baking for more tips on baking and ingredient swaps!
Conclusion on Stained Glass Cookies
Final thoughts and encouragement to try making your own stained glass cookies
Stained glass cookies are not only a feast for the eyes but also a delightful treat to share. These colorful cookies can make any occasion feel special, whether it’s a holiday gathering or a simple weekday treat. I encourage you to roll up your sleeves and create your own batch; the process can be surprisingly therapeutic!
Don’t hesitate to experiment with different shapes and colors of candies to customize your treats. The satisfaction of pulling your homemade stained glass cookies out of the oven, revealing a stunning masterpiece, is truly rewarding.
For more inspiration, consider exploring additional festive treats on SugarHero, which offers a variety of cookie recipes. Your culinary creativity awaits!
PrintStained Glass Cookies: Easy Recipe for a Sweet Treat at Home
Delight in making stained glass cookies that are not only visually appealing but also delicious.
- Prep Time: 30 minutes
- Cook Time: 12 minutes
- Total Time: 42 minutes
- Yield: 24 cookies
- Category: Dessert
- Method: Baking
- Cuisine: American
Ingredients
- 2 3/4 cups all-purpose flour
- 1 teaspoon baking powder
- 1/4 teaspoon salt
- 1 cup unsalted butter, softened
- 1 cup granulated sugar
- 1 large egg
- 1 teaspoon vanilla extract
- 1 cup hard candy, crushed
Instructions
- Preheat your oven to 350°F (175°C).
- In a bowl, whisk together flour, baking powder, and salt.
- In another bowl, cream the butter and sugar until light and fluffy.
- Add the egg and vanilla, mixing until combined.
- Gradually add the dry ingredients to the wet ingredients, mixing until a dough forms.
- Roll out the dough on a floured surface and cut into shapes.
- Using a small cutter, cut out the center of each shape and fill with crushed candy.
- Bake for 10-12 minutes or until edges are lightly golden.
- Let cool before serving.
Notes
- Keep an eye on the cookies while baking to prevent over-browning.
- Experiment with different candy colors for a festive look.
Nutrition
- Serving Size: 1 cookie
- Calories: 150
- Sugar: 10g
- Sodium: 50mg
- Fat: 8g
- Saturated Fat: 5g
- Unsaturated Fat: 2g
- Trans Fat: 0g
- Carbohydrates: 18g
- Fiber: 0g
- Protein: 1g
- Cholesterol: 30mg