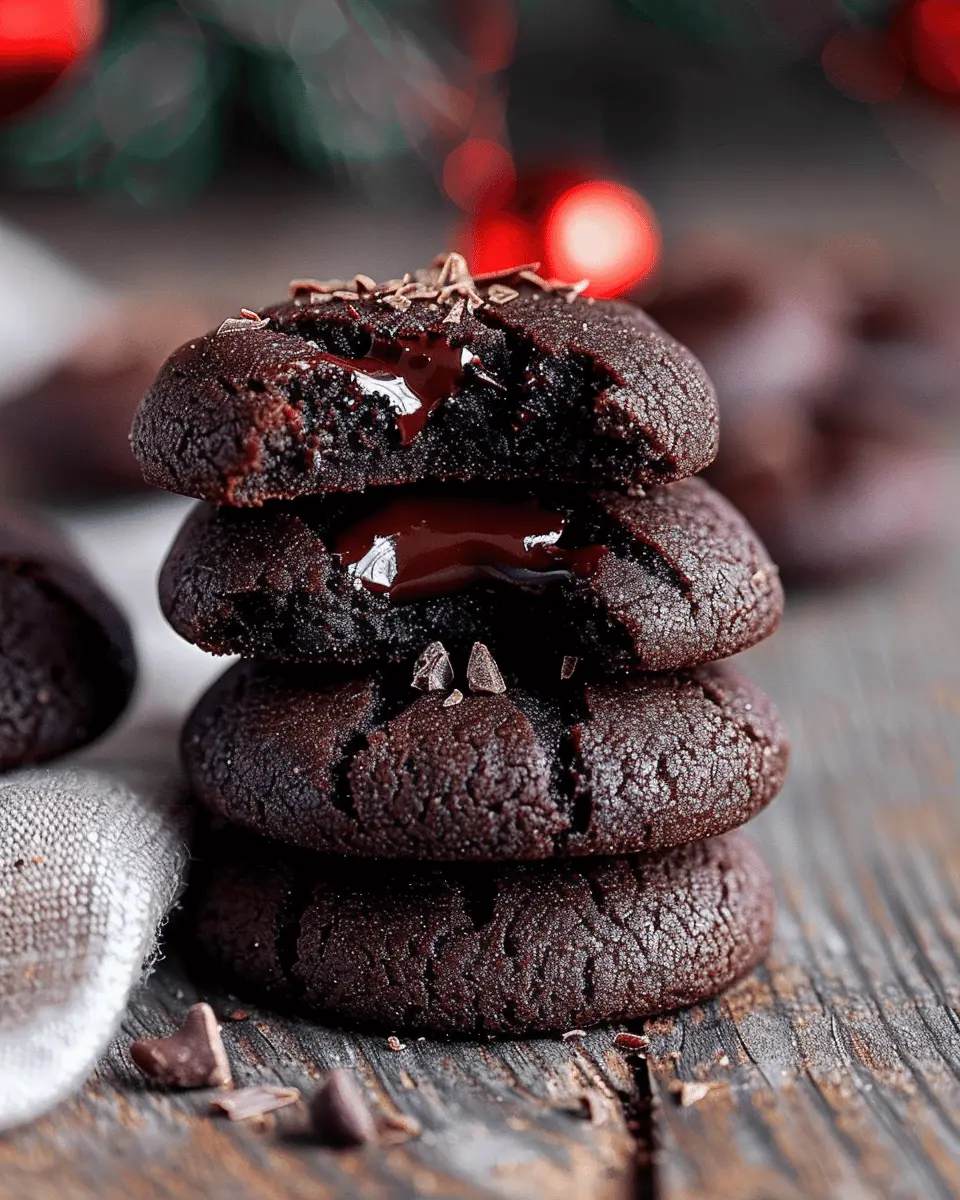
Introduction to Chocolate Thumbprint Cookies
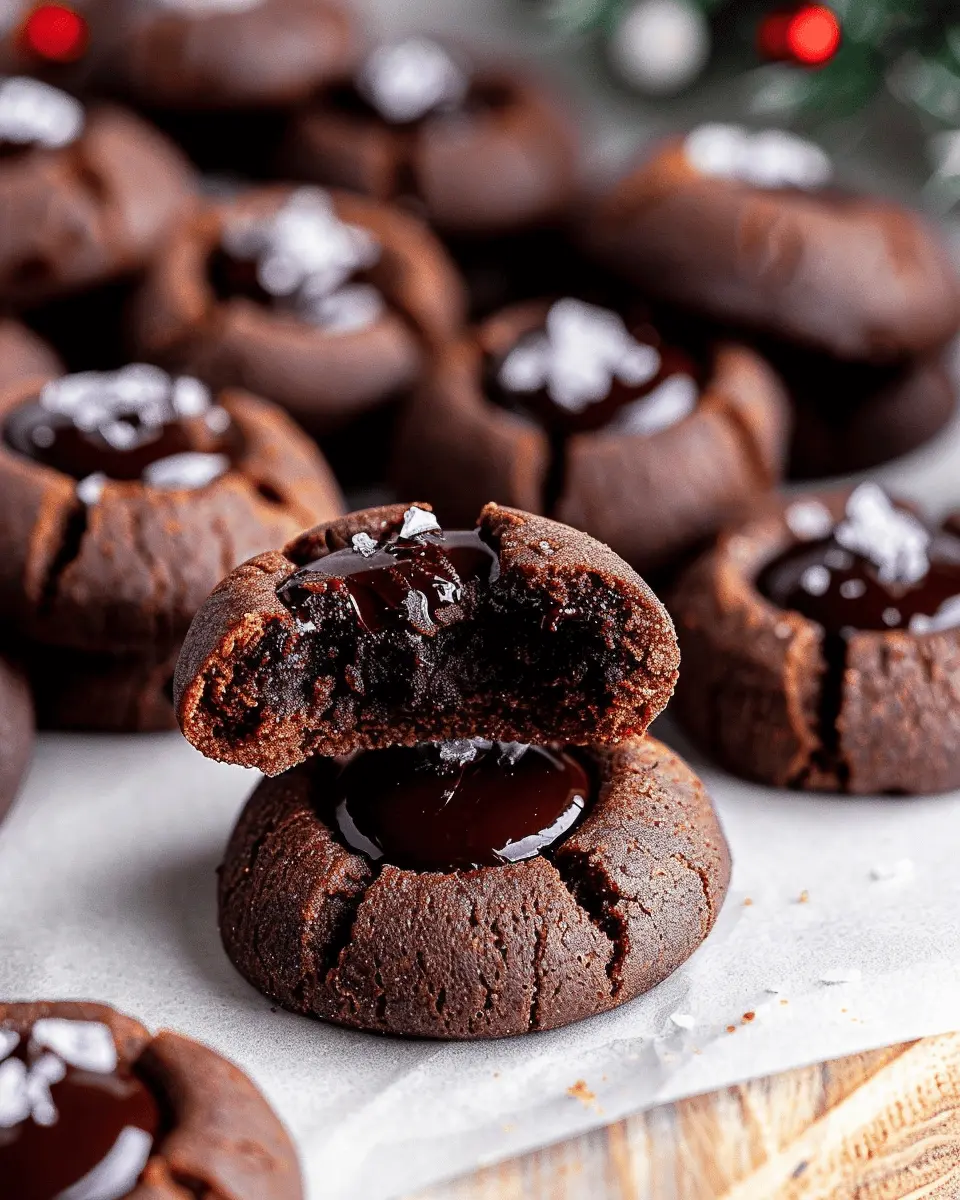
Chocolate thumbprint cookies are an indulgent treat that combines a soft, rich chocolate base with the decadent surprise of your favorite filling at the center. At first bite, you’ll experience a delightful blend of textures—the crisp exterior giving way to a tender, chewy center, all complemented by a burst of sweetness from the filling. What’s not to love?
As a young professional, life can get pretty hectic. You’re juggling work, social commitments, and perhaps even trying to squeeze in some much-needed “me time.” Enter chocolate thumbprint cookies—these treats are not only incredibly easy to make, but they also deliver a comforting, nostalgic feeling that transports you back to simpler times in the kitchen. Seriously, there’s something special about baking that makes everything feel just right.
So, why are these cookies so irresistible?
-
The Balance of Flavors: The foundation is a rich chocolate dough that perfectly balances the sweetness of whatever filling you choose—whether it’s creamy peanut butter, tangy raspberry jam, or luxurious chocolate ganache.
-
Customizable Delicacies: You can put your own spin on chocolate thumbprint cookies. Experiment by using different fillings or toppings. You can even swap in nuts, sprinkles, or a drizzle of melted chocolate to elevate them further.
-
Perfect for Any Occasion: Whether you need a last-minute dessert for a gathering, a sweet treat to share with coworkers, or simply a delightful pick-me-up after a long day, these cookies fit the bill perfectly.
Additionally, if you’re interested in the science behind baking, you might appreciate how specific ingredients like flour and sugar interact to create that perfect cookie texture. For more insights on baking fundamentals, you can check out King Arthur Baking to deepen your understanding.
In summary, chocolate thumbprint cookies are a versatile, satisfying indulgence that everyone should try at least once. Each cookie baked is not just a dessert; it’s a little piece of joy that connects you with sweet memories and the simple pleasures of life. So, let’s roll up those sleeves and get baking!
Ingredients for Chocolate Thumbprint Cookies
Essential ingredients for the cookies
To create the rich and delightful chocolate thumbprint cookies, you’ll first want to start with these essential ingredients:
- 1 cup unsalted butter (softened)
- 2/3 cup granulated sugar
- 1 teaspoon vanilla extract
- 2 cups all-purpose flour
- 1/2 cup unsweetened cocoa powder
- 1/4 teaspoon salt
- 1/2 cup powdered sugar (for rolling)
These components blend beautifully to create a smooth and pliable dough that’s perfect for making those iconic thumbprint shapes. While you’re at it, keep your workspace tidy and preheat your oven to 350°F (175°C).
Making the chocolate ganache
Now, here comes the star of the show: the chocolate ganache! You’ll need:
- 8 ounces semi-sweet chocolate, chopped
- 1/2 cup heavy cream
To whip up the ganache, simply heat the cream until it’s steaming but not boiling. Pour it over the chopped chocolate and let it sit for a minute. Then, stir until smooth and glossy. This ganache isn’t just for filling the cookies; it adds an irresistible richness that will make your chocolate thumbprint cookies truly unforgettable. For more tips on making ganache, check out this guide from Taste of Home.
Get ready to impress your friends and family with these decadent bites!
Preparing Chocolate Thumbprint Cookies
The delightful world of baking is filled with sweet surprises, and chocolate thumbprint cookies offer a perfect blend of rich chocolate and silky ganache. These cookies aren’t just a treat; they’re also a creative outlet. So, let’s get started on preparing these irresistible morsels!
Gather your ingredients and equipment
Before you dive into the creative process, make sure you have everything you need at hand. Here’s what you’ll require:
Ingredients:
- 1 cup unsalted butter, softened
- 1 cup granulated sugar
- 2 large eggs
- 2 teaspoons vanilla extract
- 2 cups all-purpose flour
- 1/2 cup cocoa powder
- 1 teaspoon baking powder
- 1/2 teaspoon salt
- Chocolate chips or your favorite jam for filling
Equipment:
- Mixing bowls
- Electric mixer or whisk
- Measuring cups and spoons
- Baking sheets
- Parchment paper
- Cooling rack
Having all your ingredients laid out not only makes the process smoother but also ensures you won’t miss anything crucial. Plus, there’s something incredibly satisfying about seeing your kitchen transform into a mini-bakery!
Create the cookie dough
Now that you’ve got your ingredients ready, it’s time to whip up the dough.
-
Cream together the butter and sugar: In a large mixing bowl, combine the softened butter and granulated sugar using an electric mixer. Beat it until the mixture is light and fluffy, which should take about 3 minutes.
-
Add the eggs and vanilla: Beat in the eggs, one at a time, along with the vanilla extract. This step is essential because it helps create a rich flavor.
-
Combine dry ingredients: In a separate bowl, sift together the flour, cocoa powder, baking powder, and salt. Gradually add this dry mixture to the wet ingredients. Mix until just combined; don’t overdo it!
Making your own cookie dough is not only fun but also a great way to control the ingredients and flavors in your treats.
Shape and chill the dough
Once your dough is mixed, it’s time to shape it into cookies.
-
Form the cookies: Scoop tablespoons of dough and roll them into balls. A cookie scoop can be a handy tool for this—it ensures uniform size and texture.
-
Chill: Place the shaped dough balls on a baking sheet lined with parchment paper, then gently press your thumb into the center of each ball to create a little well. Chill them in the fridge for at least 30 minutes. Chilling helps the cookies maintain their shape while baking.
Why do you need to chill the dough? Cold dough doesn’t spread as much in the oven, resulting in beautifully shaped chocolate thumbprint cookies.
Bake the cookies to perfection
Preheat your oven to 350°F (175°C). While waiting for it to heat up, finish preparing your cookie sheet.
-
Bake: Once your oven is ready, bake the cookies for about 10-12 minutes. Keep an eye on them as baking times may vary depending on your oven.
-
Cool: Remove the cookies from the oven and allow them to cool on the baking sheet for a few minutes before transferring them to a wire rack.
Prepare the chocolate ganache
A rich ganache filling is what sets these cookies apart. Here’s a simple way to prepare it:
-
Heat the cream: In a small saucepan, heat 1/2 cup of heavy cream until it’s just about to simmer.
-
Combine with chocolate: Remove it from the heat and add 1 cup of chocolate chips. Wait for a minute, then stir until smooth.
-
Cool slightly: Allow it to cool for a minute or two, which will thicken it slightly.
Having a luscious ganache is crucial for achieving that indulgent experience—we all want our chocolate thumbprint cookies to shine!
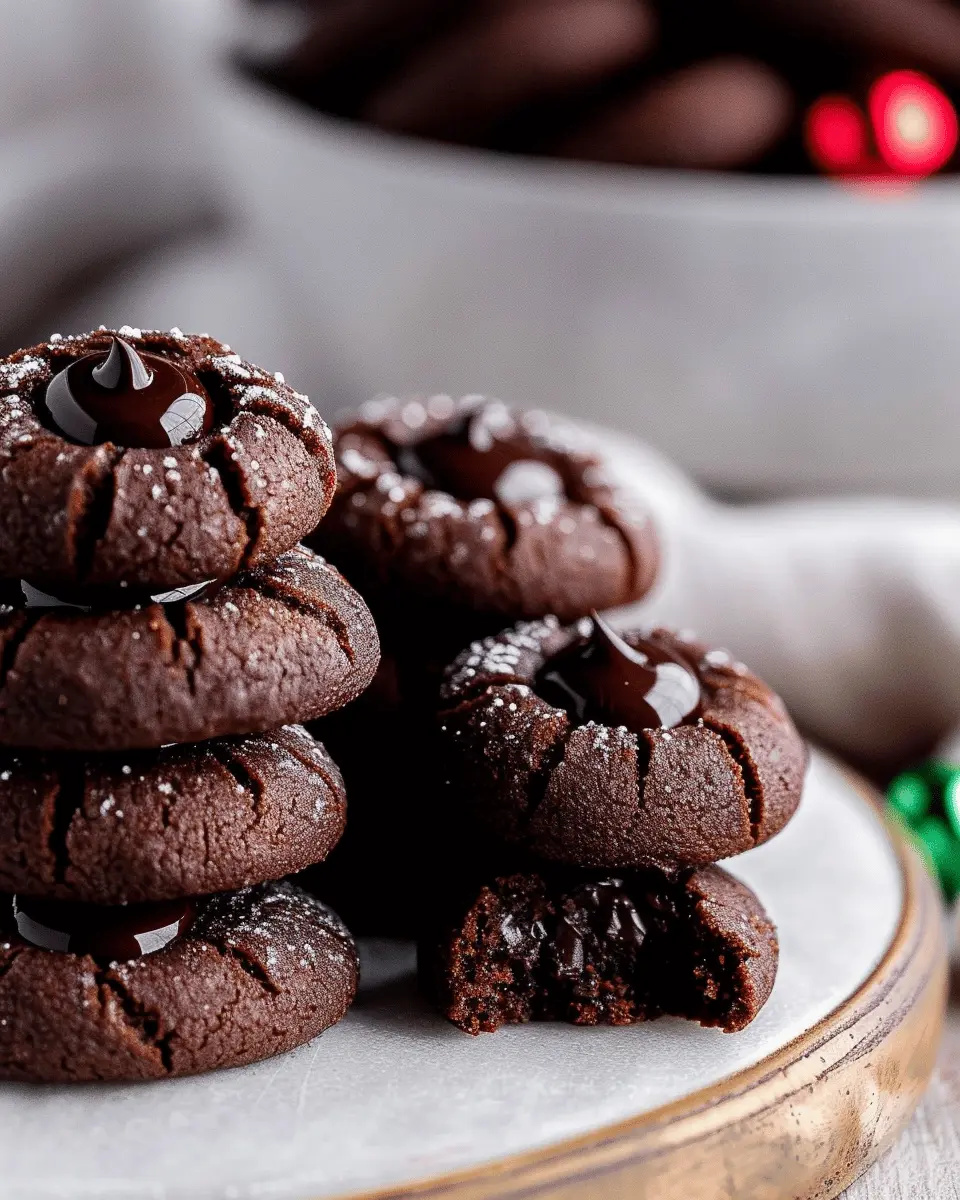
Assemble the cookies
Now comes the moment of truth: assembly.
-
Fill each thumbprint: Use a teaspoon to fill each thumbprint with ganache. Get creative! You can mix in different flavors or even use fruit preserves if you’re feeling adventurous.
-
Let them set: Allow the ganache to set before serving. If you can resist, letting them sit for a few hours makes a difference in flavor.
With these simple steps, you’ll create chocolate thumbprint cookies that will impress friends and family alike. Whether for a gathering or a cozy night in, these cookies are perfect for satisfying your sweet tooth. Happy baking!
For more expert tips on baking techniques, check out resources from the National Dairy Council or Food Network.
Variations on Chocolate Thumbprint Cookies
Looking to elevate your chocolate thumbprint cookies? You’re in for a treat! Whether you want a nutty twist or a flavor kick, small adjustments can make a huge difference. Let’s dive into a couple of enticing variations that will wow your friends and family.
Nutty Variations: Adding Nuts or Nut Butter
Incorporating nuts into your chocolate thumbprint cookies is an excellent way to add crunch and richness. You can simply chop some walnuts, pecans, or even almonds and mix them into your dough. Alternatively, swapping out some of the butter for almond or peanut butter can create a delightful nutty flavor that pairs perfectly with chocolate. Just imagine biting into a cookie that combines the creamy texture of nut butter with the fudgy goodness of chocolate—delicious!
If you’re looking for more ideas on utilizing nuts in your baking, check out these tips from the Nuts for Life website for inspiration!
Flavor Twists: Experimenting with Different Chocolates or Fillings
Feeling adventurous? Try experimenting with different types of chocolate! Dark, milk, or even white chocolate can change the flavor profile of your chocolate thumbprint cookies significantly. You can also get creative with your fillings—think about using fruity jam, caramel, or even a dollop of creamy hazelnut spread instead of the traditional chocolate ganache.
Imagine the excitement of a surprise filling when someone bites into a cookie—they’ll never want to go back to the original! For more innovative filling ideas, you might enjoy exploring Baker’s Royale.
These variations not only keep things interesting in the kitchen but also allow you to personalize your cookies to suit your palate. Baking should always be an adventure!
Baking Notes for Chocolate Thumbprint Cookies
Key Tips for the Best Texture and Flavor
When whipping up your chocolate thumbprint cookies, there are a few secrets to ensure they come out perfectly every time!
-
Use Room Temperature Ingredients: For a smooth texture, let your butter and eggs reach room temperature before mixing. This helps create a well-combined dough that bakes uniformly.
-
Don’t Overmix: Once you add the flour, mix just until combined to avoid tough cookies. Gentle folding makes a world of difference!
-
Chill the Dough: A chill in the fridge for about 30 minutes can enhance the flavor and prevent spreading during baking. This is a crucial step you won’t want to skip!
-
Perfect the Thumbprint: Use your thumb or the back of a teaspoon to create a well in the center of each cookie. The indentation should be deep enough to hold the filling but not so deep that it weakens the structure.
Looking for more tips? Consider visiting King Arthur Baking for expert insights! Happy baking!
Serving Suggestions for Chocolate Thumbprint Cookies
Pairing Ideas for Coffee or Tea
When it comes to chocolate thumbprint cookies, the right beverage can elevate your treat to a whole new level. Imagine enjoying these delightful cookies with a rich cup of dark roast coffee or a fragrant chai latte. The deep flavors of the chocolate will harmonize beautifully with the boldness of the coffee, while the spices in chai add a warm contrast that enhances their sweetness.
Also consider pairing with herbal teas like peppermint or chamomile for a lighter, fresher experience. Not only do these combinations satisfy your sweet tooth, but they also create a cozy atmosphere perfect for a quiet evening or a catch-up with friends. For more on perfect coffee pairings, check out resources from the Coffee Association!
Creative Ways to Present Them for Gatherings
Whether you’re hosting a casual gathering or a more formal affair, the presentation of your chocolate thumbprint cookies can make a delightful impression. Here are a few tips:
- Tiered Dessert Stand: Arrange cookies in layers on a decorative stand for an elegant touch.
- Mason Jar Gifts: Package them in mason jars tied with ribbons for a charming gift idea that guests can take home.
- Themed Platter: Create a themed dessert table by pairing these cookies with other treats, like cupcakes or brownies, to entice your guests.
With a little creativity, your chocolate thumbprint cookies can be the star of any gathering!
Tips for Making Perfect Chocolate Thumbprint Cookies
Ensuring the Right Cookie Texture
Achieving the ideal texture for chocolate thumbprint cookies is all about balance. You want a cookie that’s soft in the center but slightly crisp on the edges. Here’s how to nail it:
- Use Room Temperature Ingredients: Let your butter and eggs come to room temperature. This helps in creating a unified batter, ensuring that your cookies bake evenly.
- Don’t Overmix the Dough: Once you combine the dry and wet ingredients, mix just until you see no flour. Overmixing can lead to tough cookies.
- Chill the Dough: Allowing the cookie dough to chill for at least 30 minutes before baking can enhance the flavor and help the cookies maintain their shape.
Troubleshooting Common Baking Issues
Even seasoned bakers face challenges! Here are some quick fixes for typical problems with chocolate thumbprint cookies:
- Cookies Spread Too Much: This could be due to too much butter or not chilling the dough. Ensure that your measurements are precise and that the dough is properly chilled.
- Cracks in the Top: If your cookies crack, it usually means they’re cooked a bit too long. Keep an eye on your cookies, and begin checking around the 10-minute mark.
- Filling Runs Out: To avoid this, use a thicker filling or add it right after the cookies come out of the oven while they are still warm.
By following these tips, you’re sure to impress friends and family with your delicious homemade chocolate thumbprint cookies! For more baking inspirations, check resources like King Arthur Baking or Serious Eats to elevate your skills even further.
Time details for Chocolate Thumbprint Cookies
Preparation time
Making chocolate thumbprint cookies is a delightful journey that starts with a preparation time of about 20 minutes. During this phase, you’ll mix and refrigerate the dough, setting yourself up for baking magic!
Baking time
The baking process for these delectable cookies takes approximately 10-12 minutes. This short wait allows the cookies to transform from dough to delicious treats, filling your kitchen with mouthwatering aromas.
Total time
In total, you’re looking at around 30-40 minutes from start to finish. This makes it a perfect option for a quick, delightful dessert that will impress friends or family. Plus, if you’re curious about more creative cookie recipes, check out this wonderful baking resource!
Now, get ready to indulge in a tasty experience with your chocolate thumbprint cookies!
Nutritional Information for Chocolate Thumbprint Cookies
When whipping up a batch of chocolate thumbprint cookies, it’s essential to know what you’re indulging in. Here’s a quick look at the nutritional aspects of these delightful treats.
Calories
Each chocolate thumbprint cookie typically contains around 120-150 calories. While they’re a delicious way to satisfy your sweet tooth, keeping track of serving sizes can help maintain a balanced diet.
Sugar Content
These cookies boast a sugar content of approximately 8-10 grams per cookie. If you’re mindful of sugar intake, consider enjoying these cookies in moderation or exploring lower-sugar alternatives.
Dietary Considerations
While chocolate thumbprint cookies are a decadent choice, they may not suit everyone’s dietary preferences. If you’re avoiding gluten, you can substitute the flour with a gluten-free blend. For those following a vegan diet, opt for flax eggs and non-dairy chocolate. Additionally, ensuring that you choose high-quality chocolate can enhance both flavor and health benefits.
For more insights on sugar intake, the American Heart Association offers extensive guidelines on how to balance your diet without compromising on taste.
FAQs about Chocolate Thumbprint Cookies
What’s the secret to a gooey chocolate ganache?
Achieving that perfectly gooey chocolate ganache for your chocolate thumbprint cookies is easier than you might think! The key is using high-quality chocolate; opt for dark chocolate that’s around 60-70% cocoa for a rich, indulgent flavor. When heating the heavy cream, be careful not to boil it; bringing it just to a simmer will do the trick. Once combined, let it sit for a few minutes before mixing to ensure the chocolate fully melts and becomes silky smooth. If you want a little extra indulgence, try adding a splash of vanilla extract or a pinch of salt to enhance the flavors!
Can I freeze these cookies?
Absolutely! Chocolate thumbprint cookies freeze beautifully. Once cooled, place them in an airtight container, layering parchment paper between them to prevent sticking. They can be frozen for up to three months. When you’re ready to enjoy, simply thaw them at room temperature for about an hour. If you’d like to serve them slightly warm, pop them in the oven for a few minutes—this will bring back their original texture and flavor!
How do I achieve the perfect thumbprint?
Creating a perfect thumbprint is all about gentle technique. After you’ve rolled the cookie dough into balls, use your thumb (or the back of a small spoon) to make an indentation. Be careful not to press too hard, as you want the edges of the cookie to remain intact. The thumbprint should be deep enough to hold your chocolate ganache but not so deep that it touches the bottom of the cookie. If you want to ensure an even thumbprint, consider using a measuring teaspoon as a guide!
For more tips and tricks on baking, consider exploring sites like Bon Appétit or The Kitchn for inspiration!
Conclusion on Chocolate Thumbprint Cookies
Why you should definitely try making these cookies at home!
There’s something magical about pulling fresh chocolate thumbprint cookies from your oven, the rich aroma filling your kitchen. Not only are these treats visually stunning, but they also bring a delightful blend of textures and flavors to the table.
Making these cookies at home allows you to customize the filling to your liking—consider using creamy peanut butter or fruity jams for a personal touch. Plus, sharing them with friends or family is a surefire way to spread joy. With simple ingredients and straightforward steps, why not whip up a batch today? You’ll have a satisfying treat that’s bound to impress! For more baking inspiration, check out resources from the American Baker’s Association.
PrintChocolate Thumbprint Cookies: The Best Indulgent Treat to Bake at Home

Deliciously rich chocolate thumbprint cookies filled with your favorite jam or chocolate ganache.
- Prep Time: 20 minutes
- Cook Time: 15 minutes
- Total Time: 35 minutes
- Yield: 24 cookies
- Category: Dessert
- Method: Baking
- Cuisine: American
- Diet: Vegetarian
Ingredients
- 1 cup unsalted butter, softened
- 1 cup granulated sugar
- 1 large egg yolk
- 2 teaspoons vanilla extract
- 2 cups all-purpose flour
- ½ cup unsweetened cocoa powder
- ½ teaspoon baking powder
- ¼ teaspoon salt
- ½ cup chocolate chips (for filling)
- ½ cup jam (for filling)
Instructions
- Preheat your oven to 350°F (175°C) and line a baking sheet with parchment paper.
- In a large bowl, cream together the butter and sugar until smooth.
- Beat in the egg yolk and vanilla extract until well combined.
- In another bowl, whisk together the flour, cocoa powder, baking powder, and salt.
- Gradually add the dry ingredients to the wet mixture, mixing until just combined.
- Roll dough into small balls and place on the prepared baking sheet.
- Make a thumbprint in the center of each ball.
- Fill each thumbprint with chocolate chips or jam.
- Bake for 12-15 minutes or until set.
- Cool on a wire rack before serving.
Notes
- For an even richer flavor, add a pinch of espresso powder to the dough.
- Experiment with different jams for unique flavors!
Nutrition
- Serving Size: 1 cookie
- Calories: 150
- Sugar: 10g
- Sodium: 50mg
- Fat: 8g
- Saturated Fat: 5g
- Unsaturated Fat: 3g
- Trans Fat: 0g
- Carbohydrates: 18g
- Fiber: 1g
- Protein: 2g
- Cholesterol: 30mg